SET111213

How to Properly Brace Roof Trusses

The different methods for properly bracing roof trusses before sheathing is installed, and how one system stands out from the rest.

Roof truss instal­la­tion can be one of the most dan­ger­ous parts of the home build­ing process. Col­laps­es from improp­er­ly braced truss­es can result in dis­as­ter. Despite this, many builders are either unaware or sim­ply over­look the need to ade­quate­ly brace the roof struc­ture dur­ing construction.

Builders often rely on their per­son­al expe­ri­ence, result­ing in a false sense of secu­ri­ty that can have cat­a­stroph­ic con­se­quences. Just because some­one is used to doing things a cer­tain way, this does not nec­es­sar­i­ly mean it is the right way.

There are mul­ti­ple ways to safe­ly secure a roof truss set. Regard­less of the brac­ing method, it’s always impor­tant to fol­low the truss manufacturer’s instruc­tions, as well as indus­try best prac­tices when it comes to set­ting and brac­ing trusses.

Traditional 2x4 Lumber Bracing

One of the most com­mon meth­ods for brac­ing roof truss­es is using 2×4 blocks of lum­ber to pro­vide tem­po­rary sup­port before the sheath­ing is installed

How to Install Tra­di­tion­al Lum­ber Bracing:

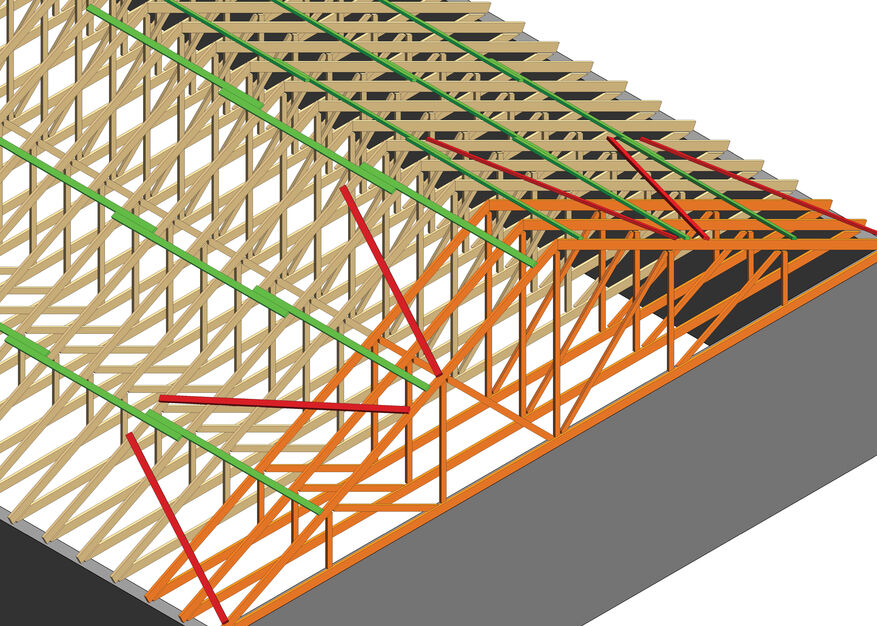
  1. Pre­cut blocks of 2×4 lum­ber to span from the top chord of one truss to the top chord of the next (See green block­ing in Dia­gram 1). Each end of the block should extend at least ¾” beyond the out­side edge of each truss. When spaced at a typ­i­cal 24” on cen­ter, this means cut­ting blocks to at least 27” in length.
    • Often builders fail to extend their blocks beyond the end of each truss, cut­ting them to only 25½”. This puts the blocks at risk of split­ting dur­ing installation. 
    • Alter­na­tive­ly, blocks can be cut to 22½” and insert­ed into the spaces between the top chords of each truss, instead of on top of each truss.
  2. Nail the brac­ing into the top chord of each truss, mak­ing sure to fol­low the truss manufacturer’s lay­out while set­ting trusses.
  3. Install diag­o­nal brac­ing, rep­re­sent­ing a W” pat­tern through­out the struc­ture (See red block­ing in Dia­gram 1).
    • Lat­er­al brac­ing alone is not ade­quate to secure roof truss­es before sheath­ing. Imag­ine putting togeth­er a book­shelf. Dur­ing assem­bly, the hor­i­zon­tal shelves will sup­port the spac­ing between the ver­ti­cal walls of the shelf, but until the back pan­el is installed, the shelf will be unsta­ble – sub­ject to twist­ing and racking. 
    • An unsheathed roof is sim­i­lar, with much more dire con­se­quences. Until the diag­o­nal brac­ing is installed, the whole truss set can sim­ply rack over like a line of dominoes.
  4. Remove the block­ing as the sheath­ing is installed.

It’s impor­tant to fol­low your truss manufacturer’s lay­out and the BCSI when using wood brac­ing to set roof trusses.

Diagram 1

Ben­e­fits of using tra­di­tion­al block­ing to brace roof trusses:

  • Mate­r­i­al is inex­pen­sive and easy to obtain (2×4 lumber).
  • Most builders are used to brac­ing roof truss­es this way.
  • If done cor­rect­ly, this pro­vides an ade­quate­ly sta­ble truss set.

Draw­backs of using tra­di­tion­al block­ing to brace roof trusses:

  • It takes time to pre­cut blocks to the cor­rect length.
  • Blocks must be removed pri­or to sheathing.
  • Addi­tion­al diag­o­nal brac­ing is required to secure the structure.

Metal Bracing

Some builders opt for met­al brac­ing to secure their roof truss­es. Often designed to space truss­es at 24” on cen­ter, these meth­ods elim­i­nate the need to cut blocks of lum­ber and pro­vide a strong con­nec­tion between truss­es. How­ev­er, most met­al brac­ing meth­ods fail to pro­vide diag­o­nal sup­port, requir­ing the same W” block­ing as tra­di­tion­al lum­ber bracing.

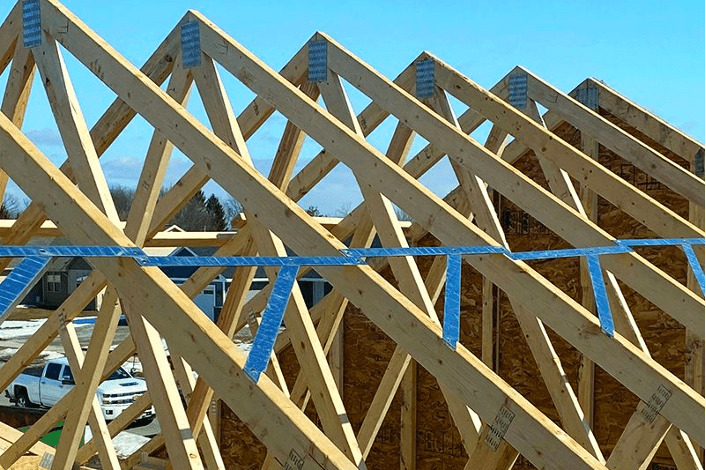
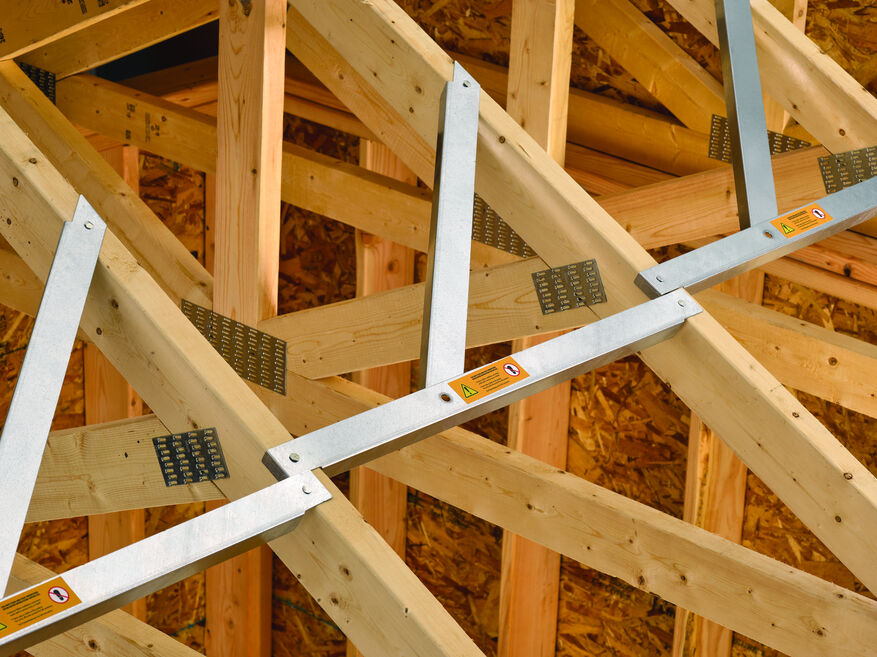
There is one met­al brac­ing solu­tion that pro­vides both lat­er­al and diag­o­nal sup­port in one appli­ca­tion – FastenMaster’s new Truss­BRACE sys­tem. Truss­BRACE is installed in the place of tem­po­rary lat­er­al and diag­o­nal brac­ing in a frac­tion of the time. 

FastenMaster TrussBRACE Roof Truss Support

How to Brace Roof Truss­es Using TrussBRACE:

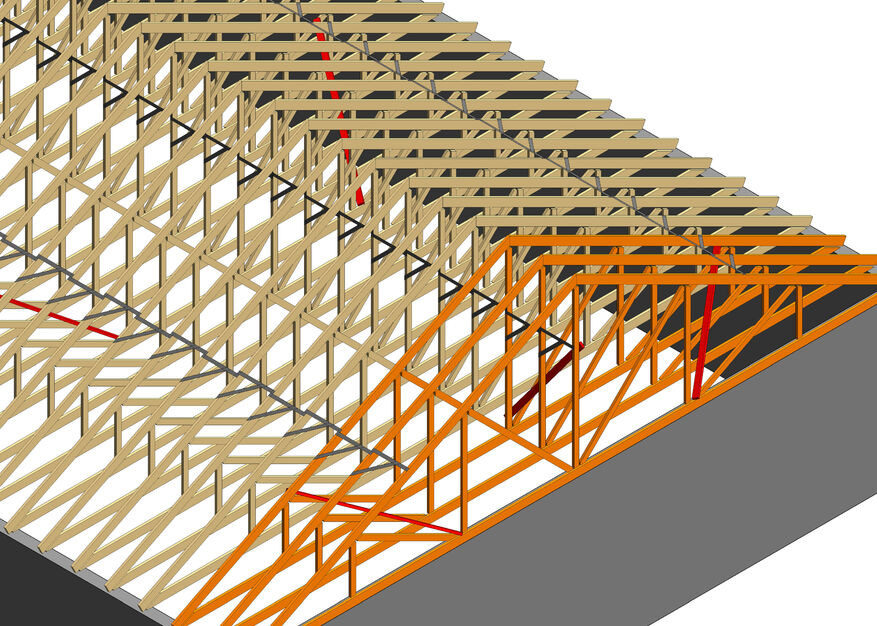
  1. Set the first 3 truss­es using both Truss­BRACE and diag­o­nal web mem­ber brac­ing (See Dia­gram 2). Truss­BRACE is installed eas­i­ly on the top chord or oth­er web mem­ber using 3 nails.
  2. Set the next 12 truss­es using only TrussBRACE. 
  3. After the 15th truss, the next 3 truss­es should be secured with Truss­BRACE and diag­o­nal web mem­ber brac­ing, and the process is repeat­ed through­out the struc­ture. If few­er than 30 truss­es are being used, apply diag­o­nal brac­ing at the mid­way point of the truss set.
  4. Apply sheath­ing to the top chord of the truss direct­ly on top of Truss­BRACE. There is no need to remove Truss­BRACE pri­or to sheathing.

Always refer to the com­plete manufacturer’s instal­la­tion instruc­tions and the truss lay­out for prop­er spacing.

Diagram 2

Ben­e­fits of met­al bracing:

  • No need to cut blocks to the cor­rect length.
  • Met­al braces are sim­ple and easy to install.
  • The Truss­BRACE sys­tem pro­vides both lat­er­al and diag­o­nal sup­port in one application.
  • Truss­BRACE can be left in place dur­ing sheath­ing, act­ing as per­ma­nent brac­ing which is some­times required by the truss manufacturer.

Draw­backs of met­al bracing:

  • Not all met­al braces are made equal­ly – some do not pro­vide diag­o­nal support.
  • Most met­al braces are only designed for brac­ing truss­es that are spaced at 24” on center.

For more infor­ma­tion on how to prop­er­ly brace roof truss­es dur­ing con­struc­tion, refer to the BCSI or to the Truss­BRACE instal­la­tion instruc­tions.